The newsletter podcast (above) is an excerpt from last Friday’s Garden Basics with Farmer Fred podcast, #350, “New Home? First Garden Tips”. America’s Favorite Retired College Horticulture Professor(℠), Debbie Flower and myself, help out a very rhythmic listener figure out how to prep a garden space at her new home. And one of the first steps to take is to do a home analysis of the soil, referred to as the “Soil Texture Triangle Test”.
Although it might look like something designed by a Freemason on Acid, the Soil Texture Triangle is quite ingenious in its design, as well as the ability to give you an insight into many of the qualities of the soil you are attempting to garden in.
But before we get into the “why” and the “how” of the Soil Texture Triangle, here’s what you may have missed if you didn't listen to Episode 350 of the podcast in its entirety:
• Get a soil test1 done to determine the texture of your soil and its nutrient levels.
• Plan your garden carefully, considering the spacing of plants and the eventual growth of trees.
• Hydro-zone your vegetables in raised beds to meet their specific watering needs.
• Limiting factors if using raised beds on concrete for gardening in partial sun spaces.

The Soil Texture Triangle Test: Why do it?
Ahhh, the things you will learn about your soil when you figure out if you have sandy loam, silty loam, clay loam, sandy clay (great name for a Top 40 DJ), something in between, or - Heaven forfend - all sand or all clay.
Christine Anne Clark is a soil health specialist with the Crops and Soils Division of the Extension Service of the University of Wisconsin-Madison. She works with farmers, researchers and agricultural industry experts, to help the farmers in Northeast Wisconsin better understand their soils. In this University of Wisconsin publication - “The important role of soil texture on water” - she points out the obviously most important part of understanding the Soil Texture Triangle right there in the title. Know your soil, and you’ll know where the water is going (or not going) in your crops:
“It is not nitrogen, but water, that is the most limiting factor in crop production. Soil texture, structure, percent organic matter (OM) and management practices also influence the amount water and nutrients a soil can retain for crop use. You can better understand your farmland’s strengths and weaknesses by digging deeper into the physical characteristics of your soil and where different soil types are located on your farm.
Soil texture refers to the feel of soil. Soils are made up of different amounts of sand, silt, and clay. There are 12 soil textural classes according to the USDA classification system. Each soil texture has varying responses to water, affecting major crops like corn, soybeans, wheat, and alfalfa differently. Here’s a general overview:
1. Sand: Sandy soils have the largest particle size, which allows water to drain quickly. As a result, sandy soils tend to dry out faster. Sandy soils have low water and nutrient-holding capacity and struggle to retain sufficient amounts for crops. Shallow-rooted crops are more susceptible to drought stress in sandy soils, as they may experience water deficits that hinder their growth and yield.
2. Silt: Silty soils have medium-sized particles, providing better water retention than sandy soils. They have moderate water-holding capacity and drainage characteristics. During drought, silty soils can retain moisture for longer periods compared to sandy soils. Silty soils have more plant-available water capacity than clayey soils.
3. Clay: Clay soils have lots of small fine particles with many inner layers creating lots of surface areas that hold water and nutrients tightly. They have higher water and nutrient holding capacity but lower drainage, resulting in slower water movement and potential waterlogging. Also, they have lower plant available water capacity than silty soils because clays hold water tightly as they dry. During drought, clay soils can retain moisture relatively well, which benefits crops like corn, soybeans, and wheat. However, excessive water retention in clay soils can also lead to root oxygen deprivation and negatively impact crop growth in wet years. Any crop with a deeper root system may perform better in clay soils during drought as it can access the stored water.
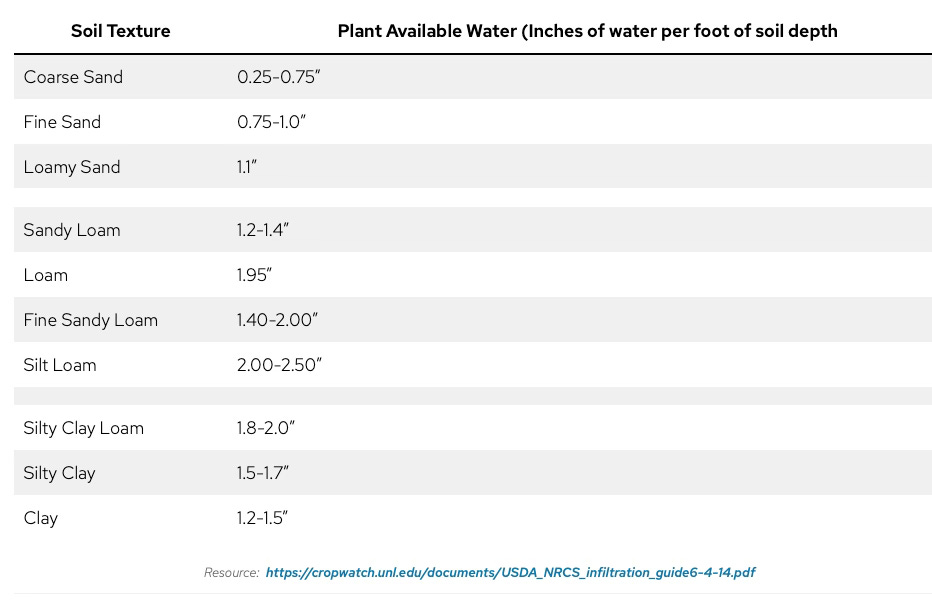
Water infiltration speed and plant water availability are dependent on soil texture. In coarse sandy soils the bigger pore spaces increase the rate of water movement and have higher infiltration rates than fine textured soils. Coarse soils can “soak” up a drenching rain or recharge quickly but is unable to hold as much water as finer textured soils. A coarse sand infiltrates very fast, up to 10 inches per hour, while a clay is the slowest can be less than 0.05 inches per hour. However, sandy soils have a low water holding capacity compared to loamy or clayey soils. On the opposite end, soils with very high clay contents hold water tightly and provide less water storage for plants than loamy soils. The table below illustrates the water that can be absorbed by soil that is available to plants, which varies with soil texture.
Organic matter increases water retention
Clark continues:
Typical Wisconsin soils have 1.5- 4% organic matter. Peat or muck soils can be over 20%. The organic portion of soil is important, it improves soil properties that help plants grow by promoting structure, pore space, and a home and source of food for soil life. Yet anytime you till and mix oxygen into the soil, organic matter is burned off a bit. Over time this can decrease the amount of organic matter in soil. Increasing soil organic matter can take 5 to 8 years depending on soil type, climate, and management.
Organic matter has a natural attraction to water. Organic matter acts as a sponge in the soil, capable of holding and storing water. It has a high water-holding capacity due to its porous structure and ability to absorb and retain moisture, plus it helps aggregation and pore space where water can be stored. Here are some general examples of the impact of organic matter on soil water:
For each 1 % increase in soil organic matter helps soil hold 20,000 gallons more water per acre.
An ideal soil with 4-5% organic matter can soak up a 4-6” rain event.
A 1994 study by Hudson showed that a silt loam soil with 4% organic matter holds more than twice the water of a silt loam with 1% organic matter.
Understanding the role of soil texture in water-holding capacity, and that organic matter significantly improves water-holding capacity can help us understand the strengths and weaknesses of a field during rainfall, irrigation, and during flood or drought conditions. Wisconsin has a wide range of soil textures. The challenge in managing sandy soils is to improve water retention or water holding capacity. In fine texture soils, however, the challenge can be to remove excess water depending on drainage conditions. Both goals can mean increased profit. Farmers cannot change the soil texture that mother nature has provided them. Although increasing organic matter content takes time, practices such as adding compost or manure, using cover crops, and practicing organic farming methods can enhance the soil’s ability to retain water and support healthy soil and healthy plant growth.”
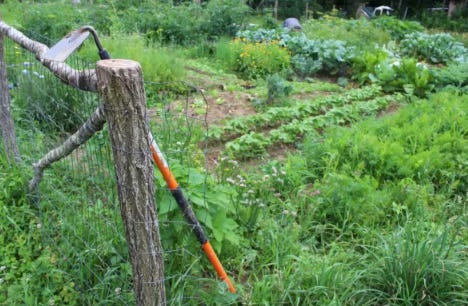
So, there you go. Even if you have achieved “Soil Nirvana” (see below), you would still need to regularly add compost, cover crops, mulch, and practice no-till gardening to keep the area thriving with microbial activity and a consistent supply of water that’s available for your plants.
Marin County (CA) Master Gardener Nanette Londeree puts it succinctly in the UCANR Publication, “Garden Good Guys - Soil”:
“An ideal soil would be made up of 45% minerals (sand, clay, silt), 5 % organic (plant and animal) material, 25% air and 25% water. The mineral portion would be loam (20 – 30% clay, 30 – 50% silt and 30 – 50% sand). It would be crumbly, relatively dark in color, smell earthy and rich, teem with microorganisms and earthworms, have plenty of nutrients and a pH between 6.5 and 7.5. This soil would be described as having good tilth. Tilth is to soil what health is to people. If you have this kind of soil now, you don’t need to read any further.”
And now you know what “tilth” is! Memorize that. It might be on the Final. Especially if St. Peter is a gardener.
So, How Do You Shake it Up, Shake it Up, Shake it Up, Shake it Up?
For that, we turn to Clemson University’s College of Agriculture, Forestry and Life Sciences’ horticulture and natural resources agent, Andrew “Drew” Jeffers. This is from the aptly named publication, “The Jar Test.”
Materials:
Straight-edged, clear jar
Permanent marker
Ruler
Watch or stopwatch
Mesh sieve or old colander
Procedure:
1) Using a mesh sieve or old colander, sift the soil to remove any debris, rocks, and large organic matter (leaves, sticks, roots, etc.).
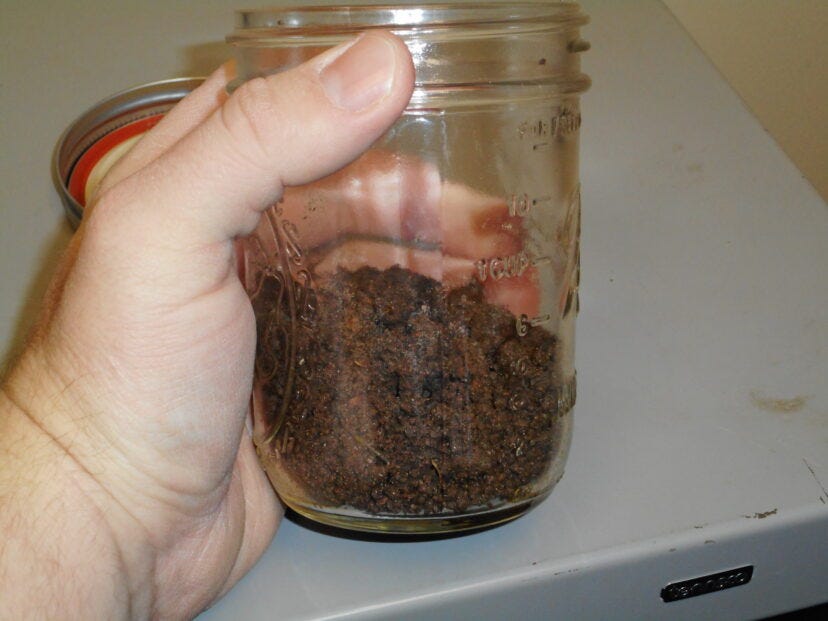
2) Fill the jar ⅓ full of the soil to be tested
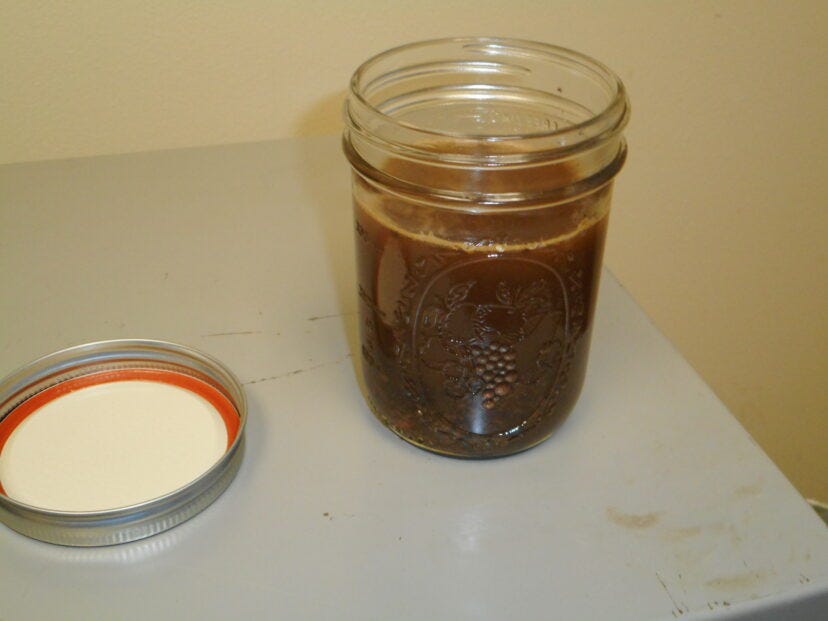
3) Fill the remainder of the jar with clean water, but leave some space at the top. (At this point, I am sure Debbie Flower is mumbling at her phone: “And add a drop of dish soap!”)
4) Cap the jar and shake vigorously (“For 10 minutes!”, yells Debbie) until the soil turns into a uniform slurry.
5) Set on a level surface and time for one minute. (“Not two minutes?” questions Debbie)
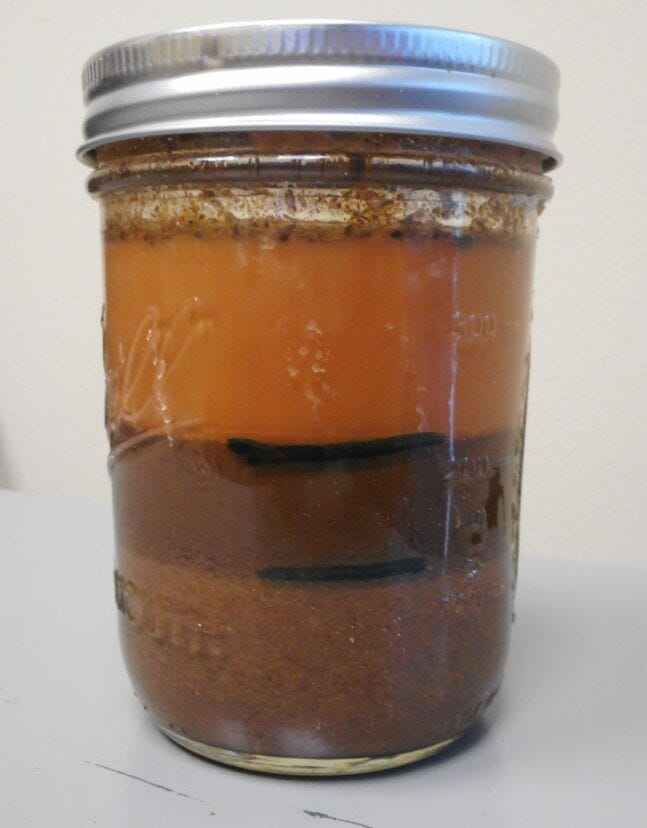
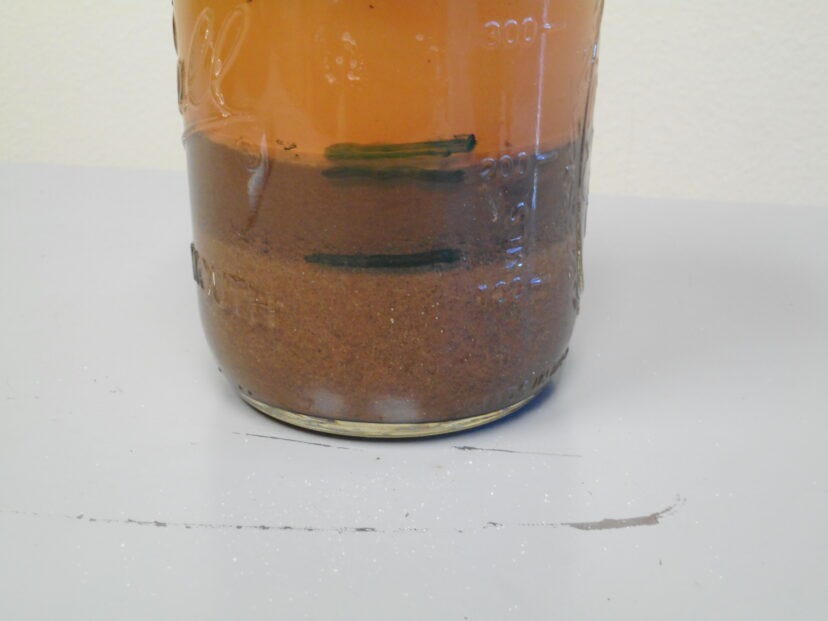
6) Place a mark on the outside of the jar, showing the coarse sand layer settled at the bottom of the jar.
7) Leave the jar in a level spot for 2 hours. (“Finally! Something I agree with!”, says Debbie)
8) Mark the top of the next settled layer with the permanent marker. This is the silt layer.
9) Leave the jar on a level spot for 48 hours. (“I concur!”, says Debbie)
10) Mark the top of the next settled layer with the permanent marker. This clay layer has settled on top of the silt layer.
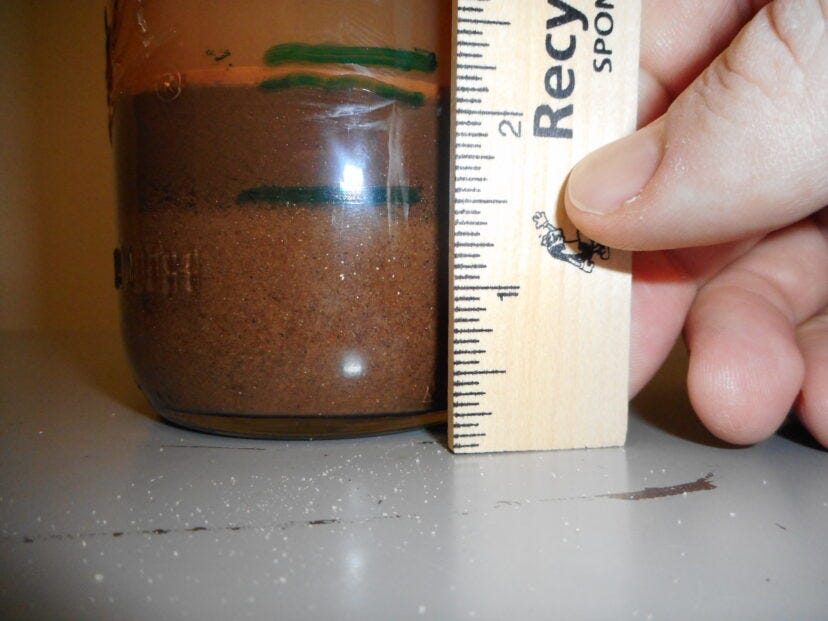
11) Using a ruler, measure and record the height of each layer and the total height of all three layers. Use the soil texture analysis worksheet below to record the results.
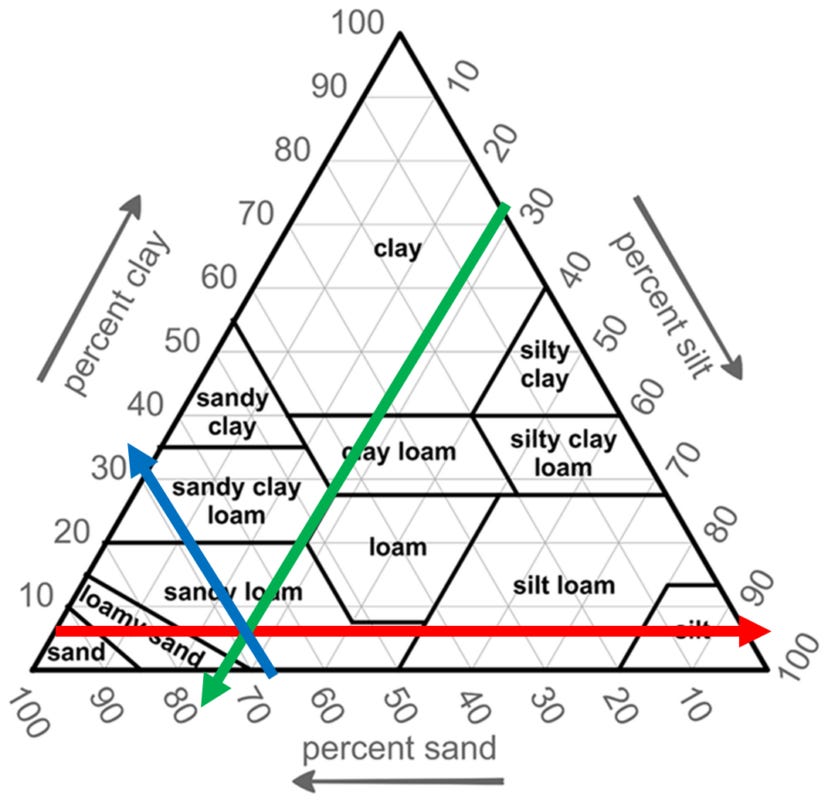
12) Use the soil texture triangle to estimate the soil type for the site.
a) The clay percentages are listed on the triangle’s left side. Lines corresponding to clay percentages extend from the percentages reading left to right (see red line).
b) The silt percentage is on the right side, with lines extending downwardly, diagonally from right to left (see green line).
c) The sand percentage is on the bottom side, with lines extending upwardly, diagonally from right to left (see blue line).
13) Track the lines with the percentages measured and find the spot on the triangle where all three lines intersect. The region where these lines intersect indicates the soil type present. The example shown represents a loam soil texture.
Adding organic matter to clay and sandy soil can help with:
Nutrient holding capacity
Improved drainage
Reducing compaction
Soil Texture Analysis “The Jar Test” Worksheet
Measurements
Height of sand layer ________inches / cm
Height of silt layer ________inches / cm
Height of clay layer ________inches / cm
TOTAL HEIGHT OF LAYERS ________inches / cm
% SAND=(sand height)/(total height) x 100 =___________ % SAND
% SILT=(silt height)/(total height) x 100 =____________ % SILT
% CLAY=(clay height)/(total height) x 100 =____________ % SILT
Thanks for reading Beyond The Garden Basics Newsletter. Subscribe for free to receive new posts. Pledge Your Support, thank you!
Thank you for also listening to the Garden Basics with Farmer Fred podcast! It’s available wherever you get your podcasts. Please share it with your garden friends.

Fred Hoffman is also a University of California Cooperative Extension Master Gardener in Sacramento County. And he likes to ride his bike(s).
Three Universities that provide inexpensive soil tests for home gardeners:


