

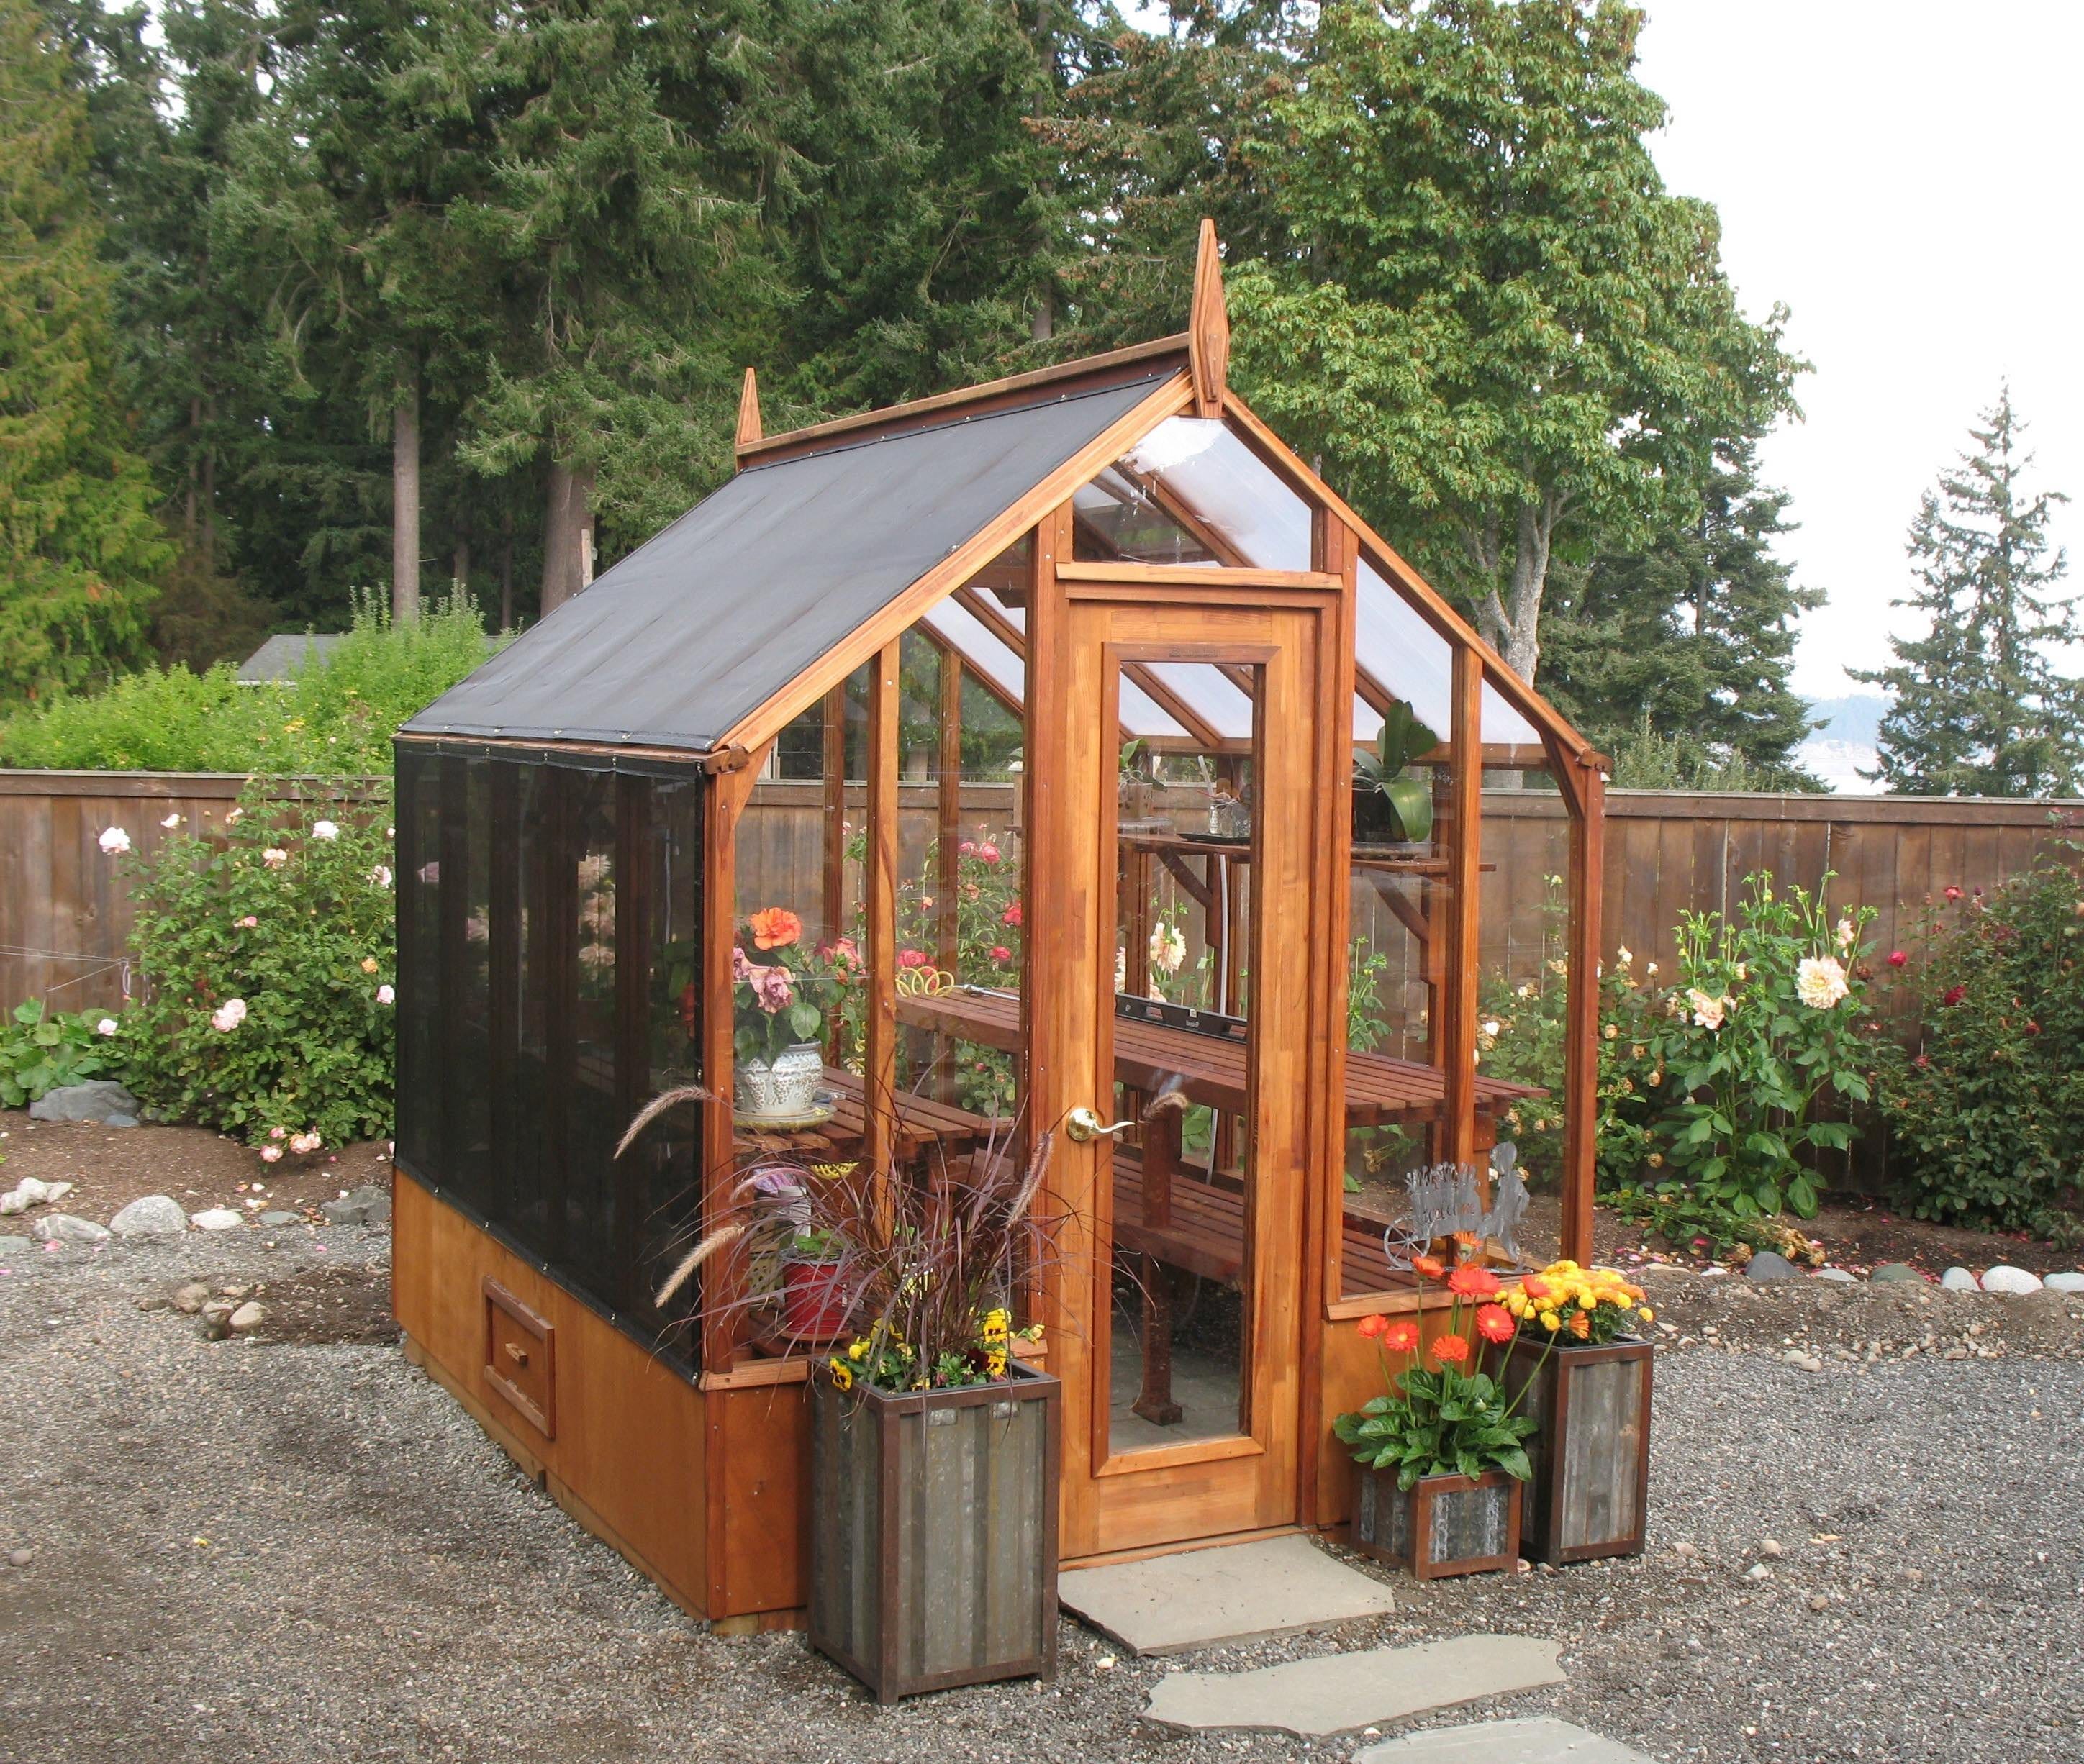
In today’s podcast, we talk with Mark Seibert of Sturdi-Built greenhouses in Oregon. The interview covers key considerations for first-time greenhouse buyers, including choosing the right site, with emphasis on sunlight, southern exposure when possible, and local hazards such as trees or lawn equipment. It also discusses heat control and utilities, recommending ventilation, shade cloth, fans, water access, and electrical service with safety protections.
The conversation then turns to foundation options, doors, glazing, and framing materials, with the foundation and structure depending on soil, size, and intended use. Seibert also explains that lean-to greenhouses can work if the roof pitch and site conditions fit, and says a well-built greenhouse can last 20 to 30 years.
Here are the key takeaways from the greenhouse conversation between Farmer Fred and Mark Seibert:
• Placement matters more than people think. Sun is your friend, but too much sun isn’t. A southern exposure is ideal, since it gives you sunrise light from the east, sunset light from the west, and a naturally shadier side too.
• Watch out for hazards near your chosen spot. Pine trees dropping cones, kids playing ball, lawn mowers kicking up rocks. All worth thinking through before you commit to a location.
• Ventilation is what keeps a greenhouse from turning into an oven. A fan running around the clock, shade cloth attached directly to the roof (not just draped over it), and an evaporative cooler for anyone who wants year round use.
• Shade cloth works best when it’s fastened down, not floating. Grommets and screws beat a loose sheet that ends up in the neighbor’s yard during a windstorm.
• Water and electricity should go in before the foundation. A hose bib mounted away from the wall, buried lines for both water and power, and a GFCI protected circuit are all worth planning for early.
• Heat mats are a game changer for starting seeds. Lay one under your peat pots and the warmth rises right up into the soil, giving seedlings a strong start.
• A fan does more than move air, it strengthens plants. Tomatoes grown without any air movement come up weak stemmed and tend to flop once fruit sets in.
• Foundations need to be level and square above all else. A treated timber and gravel bed works for smaller greenhouses, while larger ones need a masonry foundation. Skipping this step is the single biggest regret owners report.
• Door size is easy to underestimate. Anything under 24 inches feels like a squeeze. Aim for 30 to 36 inches, or go with double doors, especially if you’re hauling in potted citrus for winter.
• Screens keep the bad bugs out, but they keep pollinators out too. There’s no perfect filter, so most owners choose a fully screened setup and treat the greenhouse as a controlled environment.
• Misting the floor is the cheapest way to add humidity. Gravel, brick, or concrete floors all work, letting evaporation do the job in summer heat.
• Glass versus polycarbonate comes down to trade offs. Glass lets in more light and looks better, but polycarbonate is lighter, more impact resistant, and roughly 50 percent more thermally efficient.
• Frame material shapes performance and looks. Aluminum is strongest but less eco friendly and a poor insulator. Plastic gets brittle over time. Redwood is prized for thermal efficiency, strength, and appearance, especially clear heart redwood, which beats cedar by about 20 percent in strength.
• Lean to greenhouses need extra planning around roof pitch and eaves. Attaching to a house or garage can work well, but the pitch determines how far out the structure can extend.
• Quality costs money for a reason. A well built greenhouse can last 20 to 30 years, while cheap kits often arrive incomplete, never get finished, or collapse outright, leading buyers back to a better built option anyway.
A full transcript of our conversation is at the bottom of this newsletter.
Growing Hobby Greenhouse Tomatoes in the Winter
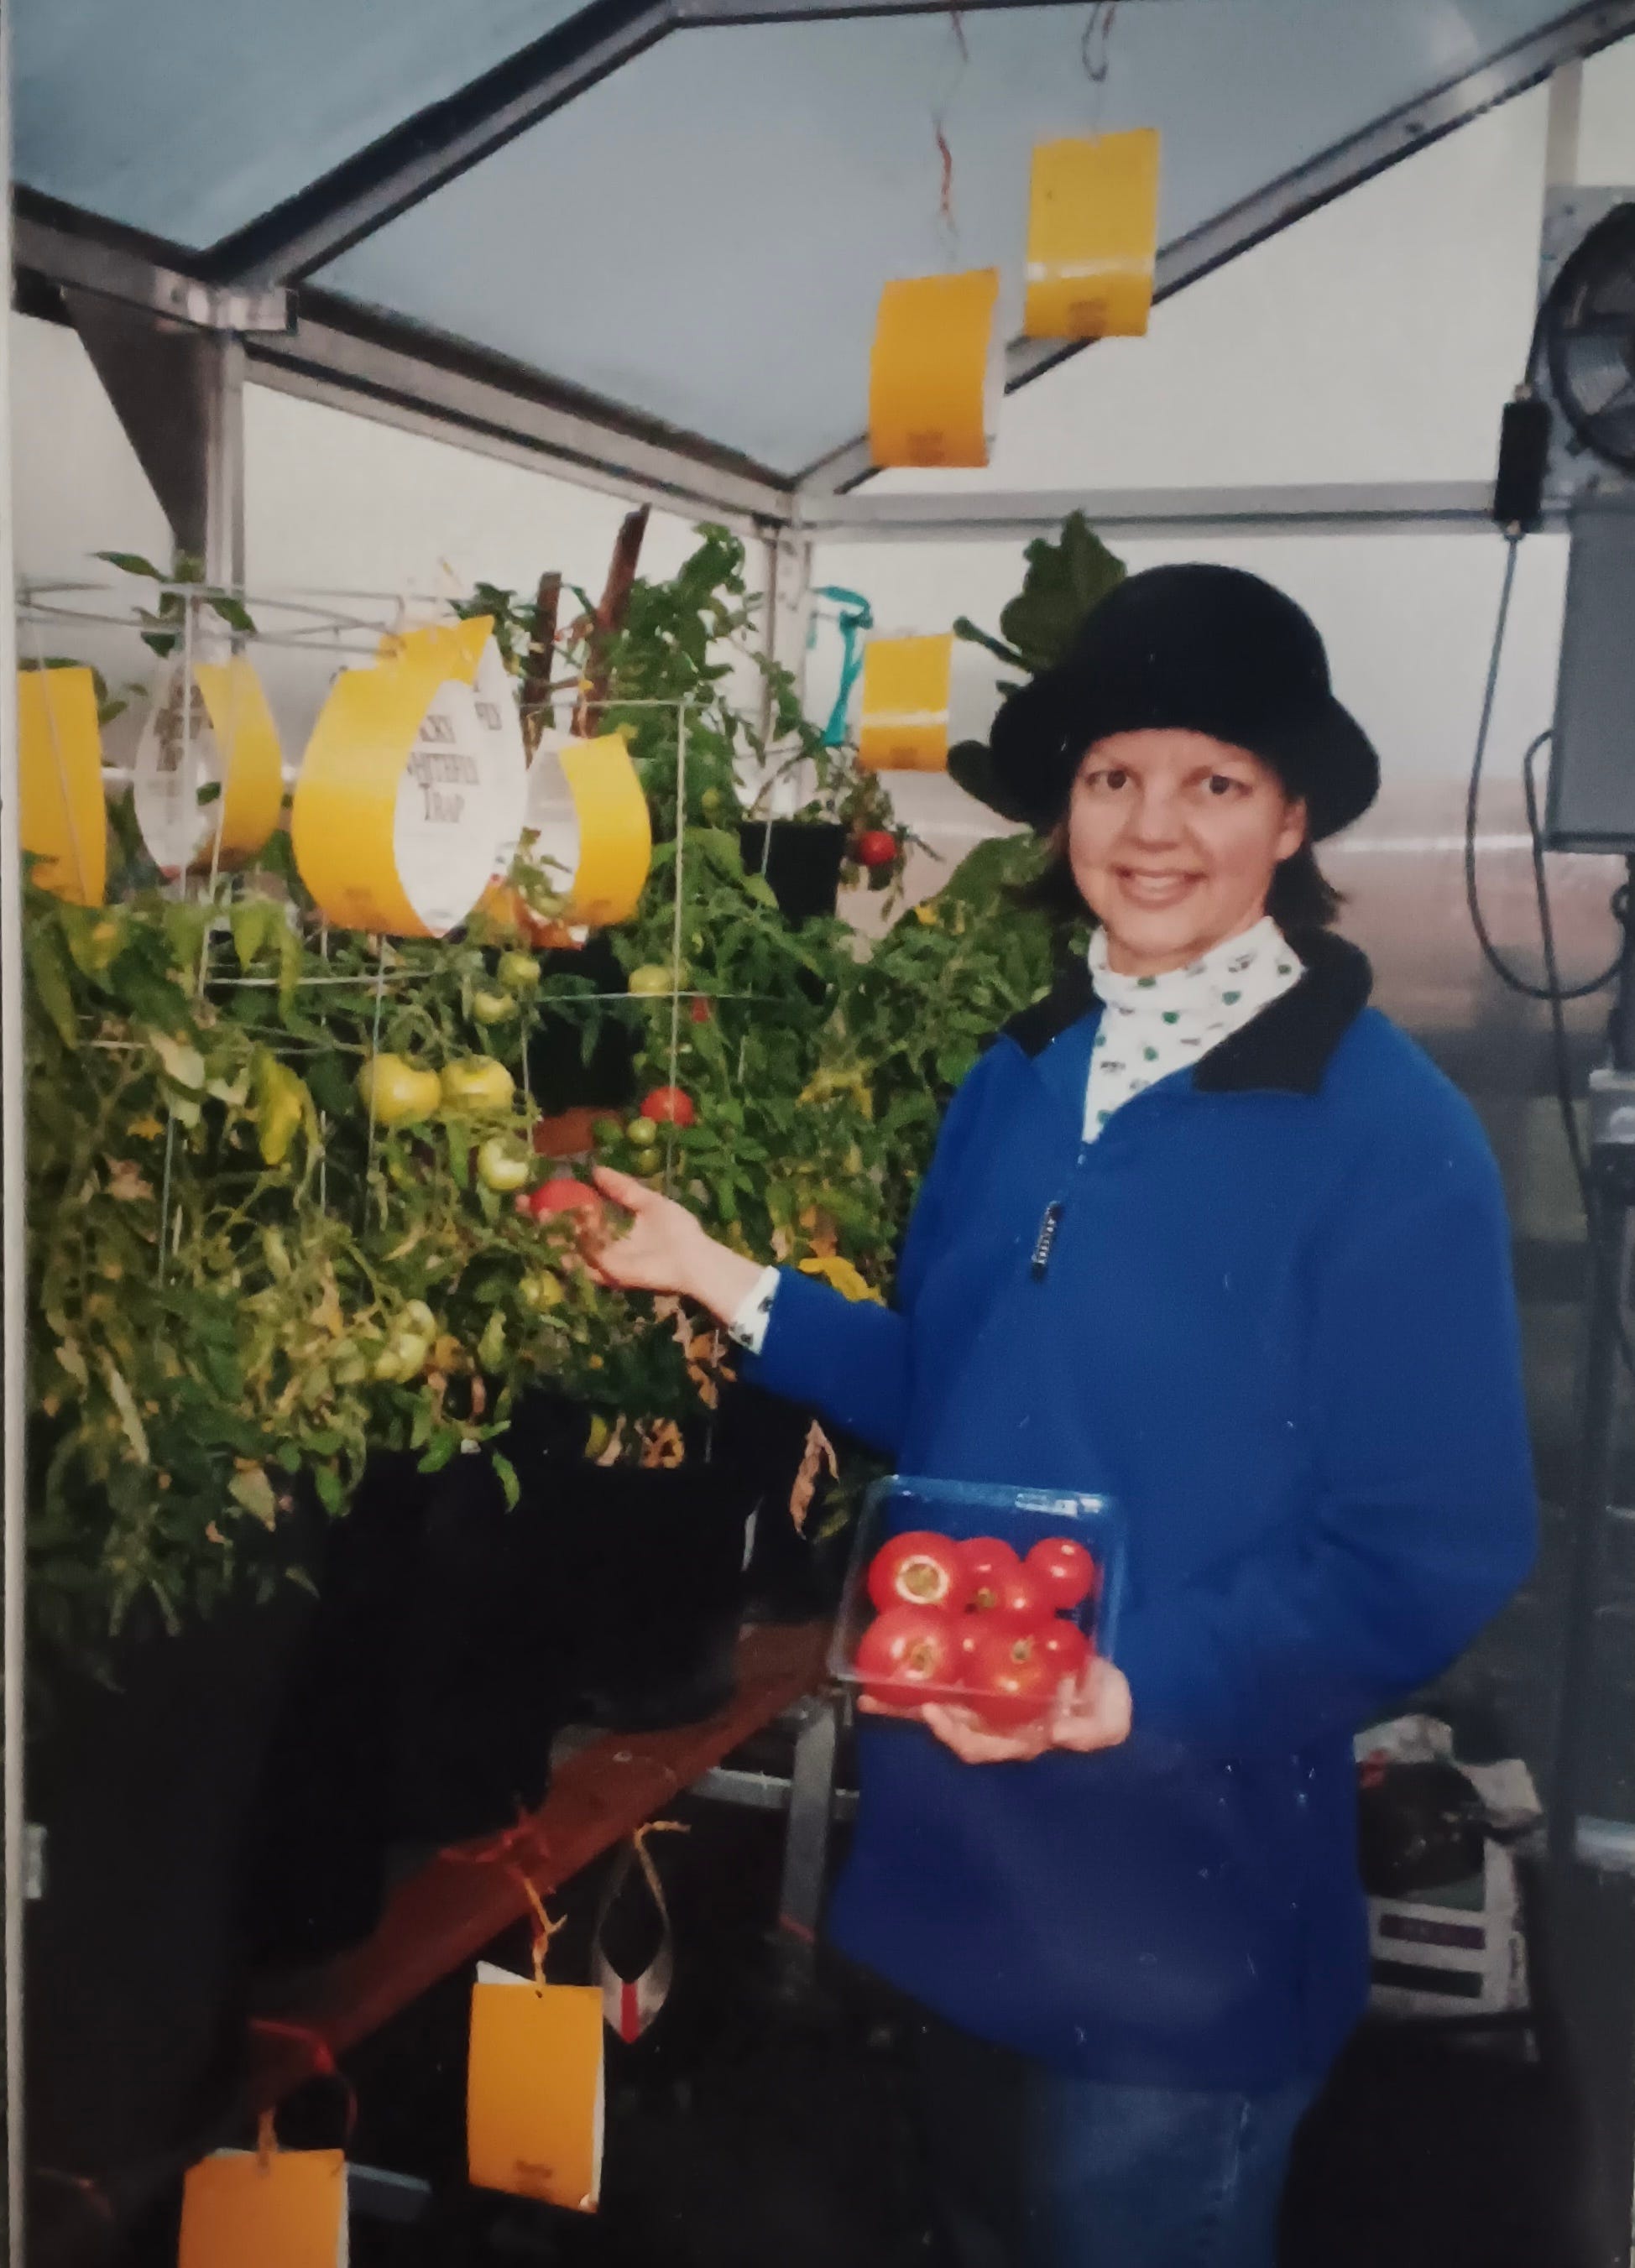
If you really want to demonstrate to your friends what a great investment your greenhouse is, nothing beats serving them home grown tomatoes...on New Year’s Day.
Here’s What You’ll Need to Grow Greenhouse Tomatoes for the Winter and Spring:
A greenhouse or an indoor area with lots of light and heat. On line, check out the selection at Washington State-based Charley’s Greenhouse. Also, check out the Sturdi-Built greenhouses of Portland, Oregon, or Greenhouse Megastore.
The Right Tomato. For the typical hobby greenhouse (6x8, 8x5, 8x10, 8x12), cool season “determinate” tomatoes are best. These tend to be fairly compact plants (under 4 feet tall) that do not put on lots of growth after they set fruit. Determinate tomatoes usually ripen at the same time; so, choose several tomatoes that will ripen at different times, going from seedling to fruit in 50-70 days. To minimize disease problems, choose tomatoes that have “built-in” disease resistance. These will have the letters “V” (verticillium wilt-resistant), “F” (fusarium wilt) “N” (nematodes), “T” (tobacco mosaic virus) and “A” (alternaria fungus) after the variety name of the tomato.
A “Warm Greenhouse” or indoor room. This is one that maintains a nighttime temperature range of 55-70 degrees, preferably above 60 degrees for tomatoes. Daytime temperatures should range from 75-85 degrees. A heater, in conjunction with a thermostatically controlled vent fan, can easily provide that temperature range in many areas of USDA Zones 8, 9, and 10.
Sunlight. Tomatoes need full sun, at least six hours of direct sun a day. Try to position your greenhouse so that it can take best advantage of the low angle of the sun during the cold months, making sure the building isn’t shaded by any evergreen trees or other structures.
Artificial light. Because of the lower intensity of the sun and the possible persistence of fog and low clouds during the winter, you will need a lighting system to supplement any natural light. Although there are many artificial lighting systems available, fluorescent lights are the most economical. Use four, 40-watt, 48-inch long fluorescent tubes side by side, keeping them 8-12 inches above the plants. Although standard “shop lights” are OK, investing in Gro-Lux wide spectrum fluorescent tubes will give your tomatoes more of the light spectrum that they can use. For the latest in grow light technology, including LED’s, check this page at Charley’s Greenhouse.
Water. Although the cooler temperatures of the fall and winter will cut down on the amount of water that tomatoes need, a drip system connected to a timer will insure that the plants get the moisture they need. Four to eight gallons of water per week per plant should be plenty.
Soil. Planting directly into the ground of the greenhouse is OK, as long as the soil drains readily, has been amended with organic matter and isn’t compacted. Building raised beds into the floor of your greenhouse works best. Make the sides of the raised bed 8-16 inches high, and at least 18 inches wide. The bed can be framed by a number of things, including untreated wood, blocks, bricks, or stacked old tires. Growing tomatoes indoors in plastic 10-gallon or 15 gallon pots works well, too. There are a lot of good container soil mixes on the market for tomatoes and vegetables, including Gardner & Bloome, Recipe 420, Black Gold, Dr. Earth and Fox Farms.
Hydroponic Systems. This technology has changed radically since I last used one, decades ago. Check with your local hydroponics store or nursery, or Amazon for more information about the latest and greatest.
Fertilizer. Because plants tend to slow down their growth in the colder months, cut your dosage of your favorite tomato fertilizer by half. For example, if the directions for a water-soluble fertilizer say to add 1 tablespoon per gallon of water, pour that same tablespoon into 2 gallons of water during the winter feeding periods. A once-a-month application should be plenty.
A Pollinator. In nature, bees and wind do most of the tomato pollination in the home garden. In the greenhouse, you can accomplish the same task by either gently shaking or holding an electric toothbrush (or similar device) next to the plant; twirling a small brush inside a tomato flower will transfer the pollen.
An Oscillating Fan. A gentle breeze blowing across the plants for several hours a day aids pollination and helps strengthen the plants’ main stems. Air movement also reduces the threat of fungal diseases.
Some greenhouse tomato variety suggestions for the colder months:
Bush Early Girl VFFNT Hybrid. A bushy plant that produces 6-7 oz. fruit. Determinate, 54 days.
Bush Beefsteak. The fruit averages 8 oz. each on a compact plant. Determinate, 62 days.
Clear Pink Early. 2-3 foot tall plant produces pink tomatoes, about 3-6 oz. Determinate, 58 days.
Grushovka. A pink, egg-shaped, 3-inch long tomato from Siberia. Plants are under three feet tall. Determinate, 65 days.
Manitoba. The fruit is over 6 oz. in size, very productive and early. Determinate, 60 days.
Northern Exposure. A compact plant that produces 8 oz. “Big Boy” style tomatoes. Determinate, 67 days.
Oregon Spring V. Developed at Oregon State University for short season gardens. Medium sized fruit that is nearly seedless. Determinate, 58 days.
Pilgrim VFFA Hybrid. 8 oz. fruit on a compact plant that boasts excellent yields and good flavor. Determinate, 65 days.
Polar Baby. Developed in Alaska. 2-inch salad tomatoes. Determinate, 60 days.
Prairie Fire. 3-5 oz. tomatoes on short plants. Tangy flavor. Determinate, 55 days.
Red Robin. The plants get only 12 inches tall, producing cherry-sized tomatoes. Good choice for hanging baskets. Determinate, 63 days.
Siberia. A favorite of Canadian greenhouses, this bushy plant reportedly will set fruit at temperatures as low as 38 degrees. Fruit is under 2 inches in diameter. Determinate, 55 days.
Siletz. 10-12 oz. tomato developed in Oregon. Determinate, 52 days.
Sub Arctic Maxi. For very cold climates. 2 oz. fruit on a small plant. Determinate, 62 days.
Sweet Tangerine. Orange-red colored fruit. Determinate, 68 days.
Tumbler. Cherry-sized tomatoes in seven weeks. Good choice for hanging baskets. Determinate, 49 days.
506 Bush. Plants only get 18 inches tall, are drought tolerant and produce medium sized tomatoes. Determinate, 62 days.
Online sources for these tomato seeds include Tomato Grower’s Supply Company, Baker Creek, and Totally Tomatoes.
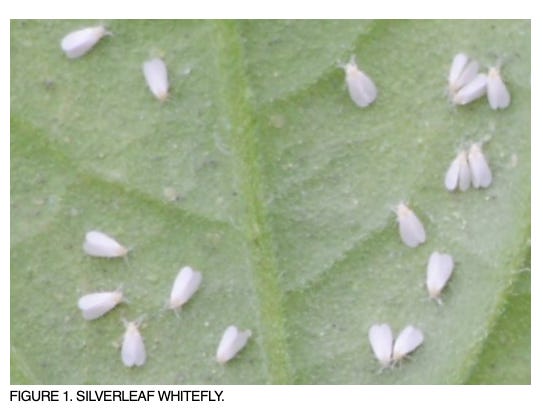
Pest Management. In our experience the biggest problem was whitefly infestations. Yellow sticky traps can let you know you have a problem as well as control small outbreaks. Insecticidal soap may be necessary for control of the whitefly problem that starts growing. In case of a severe outbreak on a tomato plant, the easiest and most effective course of action? Get rid of the plant.
However...although there are a lot of benefits to growing tomatoes in the fall and winter, there is a lot of time and expense associated with it, especially the heating costs. And, don’t expect the super sweet, succulent taste of a summer-grown outdoor tomato. But the taste IS better than a store-bought tomato. Just more expensive. But…you grew it!
PODCAST TRANSCRIPT: GREENHOUSE BASICS
Greenhouse Basics TRANSCRIPT
(originally aired in Garden Basics with Farmer Fred, Episode 170)
Farmer Fred
If you’ve listened to the show long enough, you know that I’ve owned a greenhouse for a long time I couldn’t picture gardening without a greenhouse especially in the springtime. Great for getting an early start on pepper seeds and tomato seeds, and then growing specialty items too, in the greenhouse. If you want orchids, hey, you need a greenhouse really. But if you’ve never had a greenhouse, what are some basics you should know before you plunk down your money? We’re talking with Mark Seibert, he owns sturdi-built greenhouses up in the Portland, Oregon area. They’ve been building greenhouse kits for something like 60 years. And Mark when somebody comes in who’s never owned a greenhouse, what are their usual questions?
Mark Seibert :
Hey, Fred, it’s certainly a welcome thing to be speaking with you. You know, as a former Californian, I get it living in the Sacramento area, how can be hot sometimes and windy and such? So the first question that comes to mind is where do I put my greenhouse? Because I’ve got a choice. I’ve got a shaded area over here. I’ve got full sun over there. I can put it up against my house. Is there any benefit there? So where you put your greenhouse should follow some basic guidelines and it’s all Mostly to the pirates Code, right? No rules.
Farmer Fred :
Why? I like to say all gardening is local. So I imagine all greenhouse placement is local too.
Mark Seibert :
it is local because if you’ve got a, let’s say, a large pine tree that likes to drop, you know, bombs of, of pine cones or you’ve got, you know, kids are throwing softballs learning how to throw, you’ve got, you know, a lawn mower that’s kicking up rocks, you know, all these things are considerations. But the first consideration is, the sun is your friend, but too much sun is not your friend.
Farmer Fred :
Well, we know that we know that well here in Sacramento that the people I know who own greenhouses basically abandoned their greenhouse in the summertime because you can easily get up to 120 130 degrees in there.
Mark Seibert :
You don’t abandon your greenhouse is a solution, but it doesn’t need to be. Because a greenhouse needs to breathe. If it’s well ventilated, meaning the hot air escapes and the cooler air comes in. That’s the first thing you can do. Other things you can do is to use shade cloth, which is attached to the outside of the greenhouse, which can lower the temperature inside your greenhouse. That’s two things you can do. Beyond that, you always want to have a fan going in your greenhouse to make sure the air is being mixed up, and the hotspots and the coolest spots are being mixed together. The last thing you can do if you really want to use it year round is you put in a evaporative cooler that will basically act as an air conditioner in your greenhouse while adding a little bit of humidity.
Farmer Fred :
I have a question about shade cloth, is it more effective to suspend it over the roof instead of laying it on the roof?
Mark Seibert :
suspending it over your roof is perfectly fine. I find it’s more effective if it’s right on the roof and it’s attached to the roof. For this reason. If you have a wind or a gust come up, you don’t want to be chasing your shade cloth down to your neighbor’s house. If it’s attached to the roof, we particularly prefer a solution that has grommets on the outside that are hung on panhead screws, and it’s like snapping it on, because it’s made to fit. I have customers that will just take a large sheet of Shade cloth and drape it over. I have another one that bought a structure that goes over her greenhouse that has a sheet that goes automatically across, you know, that’s not necessarily for everyone and quite an expensive solution, but just simply keep it attached to the greenhouse so you don’t end up flying or having it fly away and having to chase your neighbors. of course then again, you may have wonderful neighbors and you may be able to have a nice story when you pick it up.
Farmer Fred :
So getting back to placement of a greenhouse, which exposure is best.
Mark Seibert :
You know the, the basic rule, Fred, that I like is a southern exposure because that gives you full sun you get the sunrise in the in the east, you get the full sun and and the sunset in the West so that way there it also gives you a shady side as well. So the long part of your greenhouse if you have it Southern facing is the best. is it’s fatal If that is not if your greenhouse is oriented, 90 degrees different. Where’s the short end here, greenhouse? No, it is not. what if my location is totally shaded. What do I do? Well, you still get light in and most of the season you will. But if you still need more light, we can thank our friends in the cannabis industry who invested in LED lighting. That lighting which is so, so effective in the green and or excuse me, the red and the blue spectrums. It can provide great lighting to assist in growing for anything you need if you’re in a totally shaded location.
Farmer Fred :
Well, that brings up another question that I bet a lot of first time greenhouse buyers kind of forget about and have to approach it in the back end, and that’s what your greenhouse needs in the way of power and water.
Mark Seibert :
Great question because the last thing you need Is to having to be take buckets of water out your greenhouse. What I like to do is I like to have a hose bib inside my greenhouse. I don’t want it up against the wall, I want on the outside of my benches because I don’t like crawling under benches to turn it on. But the first thing you need is water and get it into your greenhouse, get a hose bib in there. And if you can find a solution that you don’t have to have one of those Home Depot hoses that you trip over. That’s a better solution for your water. And a water wand is always helpful. Going on to electricity. One of the things you’re gonna need in your greenhouse is a fan. You want that fan going 24 by seven. The best ones are wall mount oscillating fans, because they mix up the air. And as we all know, when we close the door on a greenhouse, It’s a stagnant air situation. Do plants grow strong if they’re in stagnant air? No of course not. Take your tomatoes. If your tomatoes grew up without any wind tension, they grow up weak once the fruit comes the plop over. not a good situation. so you have a fan so you’ll need electricity for your fans. If you have an electric heater because you want to heat your greenhouse, in the winter season or fall season you’ll need electricity for that. And if you want to put a heat mat in or if you want to start have starts heat mats are terrific aids when you’re doing starts, you’ll just put that heat mat down put your peat pots on with your seeds in them, and that heat will just go right up into those pots and they’ll start to start to grow and pretty much you’re off to propagating. So, heat mat, lights fan, all that is needed for electricity. I like running it underground from your house. Same with the water you run an underground and have come up inside your greenhouse that way there there’s no trip hazards, shock hazards, and it’s all of course the the electricity I prefer a GFCI protected circuit.
Farmer Fred :
and that goes back to the foundation of the greenhouse because electrical and water would have to be done before a foundation can go in if you’re pouring a concrete foundation, but what are some of the other foundations Besides concrete that you could use for a greenhouse,
Mark Seibert :
you know, the foundation that you choose is a function of two different things, the soils and the size of greenhouse. As the greenhouse gets larger, you’re going to need a masonary Foundation. more modest sized greenhouses hold a seven by seven, you can use a treated timber to bed of gravel, and that treated timber. And that bed of gravel is, you know, screwed together on all four corners. And I would recommend putting stakes on the inside perimeter of those those treated timbers to keep and you strap them together and you know, stakes strapped to those and then that keeps those stakes from wiggling around. So at the wood foundation in a bed of gravel so there’s no water. There’s no soil contact or water contact on those treated timbers and they stay dry. So that’s a treated timber. masonry foundation is always good, you want to have good footing on it. And then from there, you’ll probably put up mud sill on top that masonary Foundation allow you to Screw your greenhouse or attach your greenhouse easily to that foundation. But it gets even better Fred. If you if you let’s say you have a home with a, beautiful faux finish on your, on your walls, you know on your on your home, so it’s like a stone or a brick. How do you get it so that greenhouse integrates into your garden. So when someone goes into your house and I say that belongs there, it matches versus Where did that come from? So what you do is on that, that foundation and base wall, which is the sturdy part of the greenhouse at the bottom, you can put let’s say a cinder block, maybe one or two courses up, and then you on top of that, you would put a piece of wood a treated timber then you screw your greenhouse on top that. The idea is once you have that masonry wall, you can put a full finish call it brick, call it stone, and have it match your home, your garden design, and so it looks like it belongs there. How’s that
Farmer Fred :
you went beyond Me, I’m just a gardener, but I could see where a lot of people would want that matching situation. Yes. there Yeah, there you know, foundations I, having built a couple of greenhouses myself, I can tell you when it comes to foundations make it whatever you want, but make it level.
Mark Seibert :
Yes, it needs to be square. You’re absolutely right. You know, the old adage is if it’s square and level, you’re if you’re going to be putting a door in your greenhouse, that’s going to be more than a zipper tie the door that’s going to be in there and like a standard door you need, it’s going to go much easier if it’s a level and square foundation. It’s not hard to do. There’s techniques that are available to find out if it’s square, and you can always use levels. So just a little bit of advance work because you want that greenhouse to last year more than one or two seasons. If you do a good job on the foundation, you will have a long lasting little greenhouse.
Farmer Fred
We’re talking greenhouses with Mark Seibert of Sturdi-Built greenhouses In Portland, we were talking about greenhouse placement, about foundations about how you can get it to match your home, things like that. But there’s a lot more to greenhouses that you may not realize until after you’ve purchased a greenhouse and go, Oh, I wish I had done this or that. So Mark, let’s talk about some of those, this or that. And one area that I noticed on less expensive greenhouses are the doors and we talked about how you really need a good level foundation to hang a door correctly. But at Sturdi-Bilt you pre hang those doors, don’t you?
Mark Seibert :
Yes, we do. We pre hang we actually manufacture the doors in our shop, we give options for the customer. Let’s say a customer wants a Dutch door. Think of the old show Mr. Ed, you remember those Dutch doors where the top half you can open the top half the bottom half stays there? that’s sometimes a great solution. But again, when that top half is open, you’re gonna be letting flying critters in. So that’s another consideration. That’s why God invented screen doors right?
Farmer Fred : 14:04
Exactly, do you have screen doors?
Mark Seibert :
We don’t offer screen doors but our frame we use standard doors so you can put a screen door on there if you want. so you’ve got Dutch doors, you can take your door and you can put a ventilation in your door, we have a type of window, it’s, we call it a jealousy window, some would call it a louvered window. Other people may call it a Florida window depending on where you grew up. But that louvered window could be in the top half of your door. So that way the doors doing double duty. So we had Dutch doors we had we have doors with glass that you can open. And then thirdly, you can have either what they call full light door so there’s glass from top to bottom, so you’re getting more light in which is a good thing. Or you can have a half light door where though it’s just in the top. So there’s always options when you’re looking at doors, about how you want to appear even on door handles and stuff like that. So There’s some answers on doors.
Farmer Fred :
I would hope to then you have a selection of wider doors because I remember with my old greenhouse I could I could fit my wheelbarrow through. on my new greenhouse. I can barely get through.
Mark Seibert :
Oh my goodness, I’ve you know, I’ve seen those greenhouses where the it’s like a 20 inch opening and something like that you feel like you have to suck in your tummy when you walk in. So yes, we when you can get a 24 inches, the minimum door we offer but our door widths go up to 36 inches in that 35 inches, 30 inches. And of course we can do double doors that when you have a double door, you can open it up and have a five foot opening to pull just about anything in that gets to be you know, one of the things people want to use a greenhouse for is for overwintering their citrus. Let’s say you have a Myers lemon, and you want to get it in for the wintertime so it doesn’t frost over and freeze. So you want to be able to have a big enough opening so you can get your hand truck, bring it into that door. If you had a 24 inch opening. It’s a little bit hard sometimes. But if you got a 30 inch or 35 inch or 36 inch Opening, you’re golden.
Farmer Fred :
Yeah, that’s a great idea for anybody with sensitive plants that when the temperatures here in Sacramento get down to 30 degrees or 32, if you have your plants in containers, you need a place to put them. What better place than a greenhouse.
Mark Seibert :
And I like that. In fact, in my own greenhouse here in Portland, what I do is I over limit, overwinter my Myers lemon, I put my orchid in there, and I even put my strawberries in there. And even today, you know, my Myers lemon is blooming and boy, those flowers smell wonderful. ,
Farmer Fred :
Oh yeah, that’s that’s the other beauty of a greenhouse are all the aromas that are there. You brought up something earlier that I know is very vexatious to anybody who owns a greenhouse. And that’s flying critters who come into the greenhouse. And in a lot of situations, it’s white. It’s white flies, but then I’ve seen situations in my own case where it’s been a paper wasp nest.
Mark Seibert :
Yeah, and, boy, you know, from the south, we picked the word critters And boy, they are pesky. So what we want to do is if we have any windows on the, on the sidewall, let ventilation just want to make sure there’s a screen on the outside of those. Number one, if we have a roof vent that opens, we want the screens on though the whole point is get screened in. We were talking previously about having a Dutch door. And the challenge with that is you open that up and you’ll get those flying critters in. So that’s just the downside of having a Dutch door. But that door is not for everybody. The point is, what you want to do is keep those flying critters out. Some people will say, Hey, don’t you want those? The Good, good critters in to do pollination? I think that’s a great point. The challenges is how do you produce screening that only lets the good in and not the bad? I think it’s very hard in my personal experience, so I’d rather just just put out, put a you know, just put a screening in there, keep my greenhouse as a controlled growing environment. So that whatever you’re growing, you’re doing it to the type of soil type of temperature type humidity for your greenhouse. Fred, can I give you a thought or two on adding humidity in your greenhouse? Sure. Okay, you know, the cheapest and easiest, easiest way to add humidity greenhouse is to get a misting system on a timer and just spray your floor. Whether your floor is crushed gravel, bricks on sand, or in concrete and let the evaporation do its thing in the summer. That’s how you add humidity in your greenhouse. Just easy.
Farmer Fred :
And not only that, it controls the temperature too. Yes. Let’s talk a little bit about walls of a greenhouse. I noticed that the sturdi-built website you use a lot of glass in your greenhouses instead of polycarbonate. Why is that?
Mark Seibert :
Well, glass is , when you’re in your greenhouse you want to be able to look out and also glass has the ability to you know let a lot of light in so it’s got that double good there. The glasses also architectural because itself has has rigidity And then help the structure for for that. So polycarbonate is also a material that we use. You know, as far as exterior glazing we use the term glazing in greenhouses. You can use standard glass, which is a Neal glass agent an inch thick, or you can use tempered glass, which is four times now we’re in the other. The third material we can use on the outside is a polycarbonate that is such a great material, you look at it on the side and looks like cardboard. That’s why they call it twin wall polycarbonate. And when you do use polycarbonate, you want to make sure that you have a UV coating on the outside because that polycarbonate and that wonderful California sun will end up eroding itself and you’ll end up getting brittle. So the idea is you can use twin wall but the twin will have some other attributes you need to be aware of. Some are good number one is lighter than glass. So with these, your honor frame number two, it can take a hit. So you can take twin wall and as long as it’s mounted in a good channel. You can count on it. So say a softball hits it. Not a problem. So the other attribute is R value. Now R value is a term we hear mostly with insulation. So you have your R 19. r 24 that you can see at Home Depot, it’s this pink insulation and stuff will the same value is used when we’re talking about the glazing on a greenhouse, but let’s go back to glass. Glass has a very unimpressive R value one. Okay, can we do better? Well, tempered glass is still glass, so it’s still one. What about that twin wall polycarbonate at twin wall polycarbonate, depending on which how thick it is, is about 50% more thermally efficient so it has an R value of one and a half. How’s that for exterior glazing?
Farmer Fred :
Well, at least polycarbonate is lighter than glass.
Mark Seibert :
Oh yeah, easier to put in. But it does have its downsides here and there.
Farmer Fred :
Another thing you do with the greenhouses that you sell are the The walls the the frame, it’s redwood.
Mark Seibert :
Oh, yes, it is, you know, we all have, there’s a lot of choice in the frame of your greenhouse. And there’s reasons why you would choose one or the other. Let’s start with metal. And then we’ll go to plastic, and then we’ll go to wood. We’ll kind of compare and contrast. First of all, you can have a metal frame greenhouse, it’s going to be the strongest greenhouse material out there. Great framing. The downside is most of the metal we use today is aluminum. Where’s the aluminum come from? It comes from strip mining. I’m not personally a fan of strip mining. So I would rather not use the material for that. The next thing to know about metal is from a thermal efficiency. Metal will allow heat and cool to transfer for far more than other materials. So that’s metal. The next thing you go to is plastic. Well, plastic is fine, but over time, plastic will get brittle. And not only that, where’s the plastic come from? I don’t want to have dinosaurs growing anymore. So I bet not reduce the amount of plastics I use and be more more economical and more ecological. So that leaves wood what I like about wood is that it’s more thermally efficient than any other material. It looks great and can be in a strong enough and when you looking at wood there’s different species of wood and each one has a positive negative, you can use cedar For example, we choose to use a California Redwood, clear heart Redwood and that clear heart Redwood compared to Cedar is 20% strong work more stronger, has natural oils in it. And it’s just a just drop dead gorgeous when you get that stained up and just looks great.
Farmer Fred :
Yeah, we didn’t even have time to get into lean-tos, but there’s that whole phase of greenhouses as well besides free standing.
Mark Seibert :
Yes, there is. So you know, just, you know, you may have the side of your garage, you may have the side of your home, we say that would be a great place to attach a greenhouse. You may want to do use it for multiple use. It is possible to do that. Of course, it’s always a horticultural space, not a living space. So it’s a little bit different on the building codes. But it is possible to attach it to your home, use your existing home siding. So your home is fine, and then go out from there. But you know, attaching your greenhouse or having a lean-to your on your greenhouse, you always have to think about where it will attach to because the every greenhouse should have a roof pitch, because we want the water to go down, you’re down the roof and to the ground. And that roof pitch will will affect how wide your greenhouse can be. So if you’ve got an eave, that’s eight feet, and you have a roof pitch of a greenhouse, you may only be able to go out about six feet on your greenhouse, if it has to go under that eave if it has to go out and around eaves, a different story. But if you’re, you know, depending on your situation, it’s best to call your greenhouse manufacturers ask them how it’s going to be attached. Ask them what’s possible.
Farmer Fred :
Good point, we should I want to point out something. If there is one business that truly lives by the phrase, you get what you pay for. It comes to greenhouses and if people are greenhouse shopping, you’re gonna see a wide range of prices will trust me any greenhouse, less than four figures is going to be a greenhouse, you may soon regret right after getting it, that you need to spend a little money to get a good quality greenhouse that you’re going to be happy with. And happy customers is the name of the game. I would think at Sturdi-Built.
Mark Seibert :
It is the name of the game because the greenhouses we built should last to 20 to 30 years. How do we know that? Because I’m, I have we have avid gardeners or using our greenhouse. And when their greenhouses run its course it’s usually a greenhouse in 20 or 30 years old. The other green at the only other greenhouse that was younger than that, that we’ve replaced is one that had a bad foundation. We were talking earlier about foundations. Well, that foundation went South because the customer used railroad ties, when they cut those railroad ties, they were treated on the outside, but that cut, they did not retreat. So they rotted out, bad foundation, whole green house had to be replaced. But when you when you invest, it’s like an investment. Because you know, you can, you can spend a little bit of money and the economically, you know, fine on that. But you’ll end up having to re spend the new dollars to replace that effort balls down. You know, we’ve had customers that they ended up being our customers, they come to us and they say, Okay, how much is my greenhouse, let’s say, a 7 by 9 Trillium greenhouse and they’ll say, look at the price on that and I’ll say, golly, gee, you know, we can do better. So they’ll go to another source. They’ll purchase that, and they’ll come back and I’ve had customers come back says A) we never had, we were never able to finish it because the kit was incomplete. B) the kit was never delivered or C) it fell down. So all those things Things happen and I’ve seen this happen over and over again that I can almost tell the customer says you’re going to be coming back and here’s three reasons. Yeah. And when you do we’ll be glad to see.
Farmer Fred :
sturdi-built is based up in the Portland area. Their website is sturdi-built.com and I’ll spell that for you. It’s S-T-U-R-D-I-B-U-I-L-T dot.com Mark Seibert, owner of Sturdi-built greenhouses. Thanks for giving us some greenhouse basics today.
Mark Seibert :
You’re very welcome Fred and good growing for you and for your audience.
Fred Hoffman is also a University of California Cooperative Extension Master Gardener in Sacramento County. He has affiliations with Amazon and Smart Pots. And he likes to ride his bike(s). Thanks again for your paid subscription!